Tales of the Watcher: A Pillars of Eternity I + II No Reload Thread

Enuhal

Habitué
Messages
199
Six Crowns for a Singer: Thayn Goron's Triple Crown Full Saga Run - Update 23: Crookspur

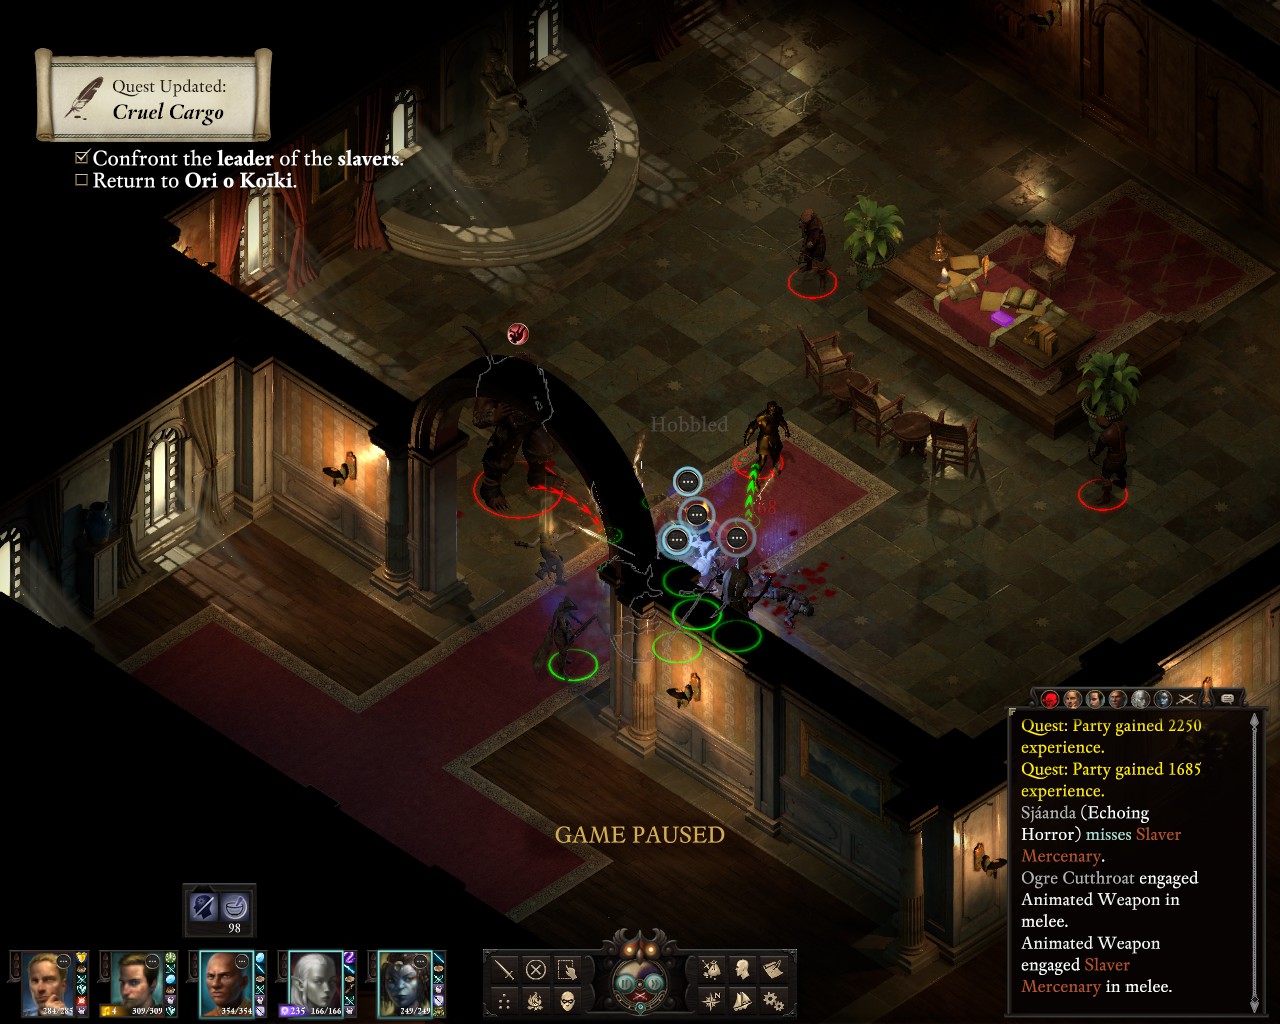
A relatively short update. All faction quests collide in Crookspur, but the actual content is relatively short. First, we sail to Ori o Koiki and make a deal to clear out the slavers, which fits well within our plan of siding with Captain Aeldys for the endgame. Compared to the previous faction quest we did, Shadow under Neketaka, the slavers are quite easy to deal with. The party enters via the sea cave towards the dungeons, we free the prisoners and clear out the area before making our way inside the fort, where their leader falls rather quickly:
20240919151107_1.jpg
The outside area is actually much more dangerous. The level scaling kicks in with the slavers throwing around high level spells such as Wilting Wind and Gaze of the Adragan. Luckily FotD protects us entirely against Gaze of the Adragan, and Doador is able to outheal Wilting Wind, though our animated weapons get petrified from time to time:
20240919151529_1.jpg
After we're done here, we return to the various faction headquarters and get to level 18:

Thayn Goron: Rise Again
Cymedrol: Tough
Doador: Improved Critical
Sjáanda: Reaping Knives
Nerthol: Spell Resistance

I've decided that, for this run, there's no good reason to risk doing some high level content such as exploring the northwestern endgame areas, Berkana's Folly or the Splintered Reef (and, of course, no reason for DLC content) - we already have the few specific items that I wanted for my characters to shine, and with the northeastern exploration, some high level bounties and Magran's Teeth still remaining, we will easily make it to level 20 anyway.
 

Enuhal

Habitué
Messages
199
Six Crowns for a Singer: Thayn Goron's Triple Crown Full Saga Run - Update 24: North-Eastern Exploration

To finish up the optional content, we explore the north-east, which mostly includes the Collapsed Coal Mine and the Flooded Cave, plus the last few available bounties. The animated weapons combined with Spark the Souls of the Righteous do great work and most of our damage:
20240919155012_1.jpg

20240919155638_1.jpg
The ancient lich battlemage was a bit tough to deal with - while taking down its allies was easy enough, we are lacking some kind of arcane dampener effect in this party, so I had no way to dispel his buffs, and his defenses while buffed are extremely strong. As a result, this battle took quite a while:
20240919160615_1.jpg

20240919161004_1.jpg
At Eccea's cave, we got into a little duel between animated weapons - but we have double the numbers and our targeting is a lot smarter:
20240919161922_1.jpg

20240919162117_1.jpg
We turn in the remaining bounties, the exploration quest and gain level 19:

Thayn Goron: They Did Sing a Song of Carnage, The Arrow Sings (two great pickups - an extra weapon for our main summon - which means two extra weapons for a backoner - and "The Arrow Things" will now be part of our primary chant, together with Mith Fyr - together with the animancy cat, the buffs to our summons are pretty insane)
Cymedrol: Overbearing Guard, Farcasting
Doador: Prestige, Incarnate (I'm definitely trying out the latter)
Sjáanda: Shared Nightmare, Prestige
Nerthol: Great Maelstrom, Prestige (we also gain our final Ancient unique spell, a beast summon called "Aspect of Galawain")

I noticed when turning in the final bounties that I forgot to take on the Steel Preacher, so I sought out that one as well - a good opportunity to test out some of our new spells - here you can see the dawnstar incarnates and the Aspect of Galawain, this time manifested as a wolf:
20240919163910_1.jpg
Magran's Teeth are our next target.
 

Enuhal

Habitué
Messages
199
Six Crowns for a Singer: Thayn Goron's Triple Crown Full Saga Run - Update 25: Magran's Teeth

Finally, time to go to Magran's Teeth. Not a ton of battles here, but once again we make use of our new endgame summons:
20240919204820_1.jpg
Since I wasn't quite sure how tough the upscaled dragon battle would be, I decided to part peacefully with the beast by convincing it to flee:
20240919205133_1.jpg
While it is entirely possible not to get into any fights with the rathun as well, I did pick a wrong option during one of the conversations and got into some battles, but they weren't all that dangerous or noteworthy.

Upon our return to Neketaka, we get to level 20 - just in time for the final faction quest. We sail straight to Aeldys and, for one last time, level up and equip our benched party members, as we have to prepare them for the ultimate boarding battle.

Thayn Goron: Prestige
Cymedrol: Unbreakable (I don't think we will need this, but just in case...)
Doador: Lasting Empower
Sjáanda: Protective Soul
Nerthol: Potent Empower

Next time: The fight for the Fonferrus.
 

Enuhal

Habitué
Messages
199
Six Crowns for a Singer: Thayn Goron's Triple Crown Full Saga Run - Update 26: Boarding the Fonferrus

We help Aeldys overthrow Furrante by showing the council proof for his dealings with slavers and the VTC. Easy enough. Now, we sail out to sea and speak the oath of the Darcozzi Paladini. A pretty epic scene. The príncipi really get by far the best final faction quest.

Lucia Rivan appears with her ship, and we don't have the really high speech stats required for a peaceful solution here. This is the ultimate boarding battle, and we have to fight against a bunch of powerful vessels, including fampyrs.
- Doador opens with Minor Avatar, Dire Blessing, Devotions
- Nerthol goes for FotD, followed by empowered Insect Plague
- Unusually, Sjáanda starts directly with Ringleader before starting to acquire focus - there are a couple low level/will enemies here and we need to stem the tide of foes so we don't get overwhelmed right away
- Thayn Goron summons ancient weapons
- Cymedrol activates his Vigorous Defense/Tactical Barrage, plants a Delayed Blast Fireball and follow up with Gaze of the Adragan
However, I make a big mistake, activating a figurine with Thayn Goron - each character can only have one source of summoned allies active, and this cancels all the animated weapons, our main source of damage:
20240919215704_1.jpg
Nerthol calls in an Aspect of Galawain; However, her insects only affect the fampyrs. I should have known that, I know skeletons are immune to that effect - A few bad choices on my part here. However, Cymedrol's illusion spells work very well - both his Gaze of the Adragan and followup Ryngrim's Enervating Terror hit quite a few opponents. Now Doador calls Incarnate summons, Nerthol activates Nature's Mark - both ancient fampyrs are for now dealing with our allied NPCs, which is good - gives us time to get everything in order. Soon after that Sjáanda ascends and we can start the cipher powers - first a Time Parasite to speed things up. Next Ancestor's Memory for Doador (who has since been Sparking the Souls of the Righteous while Nerthol has contributed Weather the Storm) and the priest casts Salvation of Time to prolong all our buffs, including the ascension:
20240919220439_1.jpg
Sjáanda is ready to go off. She casts defensive mindweb for safety and starts spamming Amplified Wave. We also now get our second set of weapons, finally. The enemy is taking serious damage:
20240919220513_1.jpg
Finally we're bringing down Lucia Rivan - she is tough, but not as tough as the ancient lich battlemage - there are still ancient fampry and risen mages around, though:
20240919220714_1.jpg
Nerthol and his Aspect of Galawain take on the fampyrs, the others go after the mages:
20240919220824_1.jpg
Aloth and Pallegina kind of block our way upstairs here, but eventually we can just use Incarnate (gained back thanks to the brilliant inspiration) and ancient weapons again above the heads of the blocking companions and win the fight:
20240919220901_1.jpg
Over all, the battle was surprisingly easy despite the level scaling. We weren't in serious danger at any point.

Now the Floating Hangman is ours. We return to Dunnage and sail directly into the storm, leaving the Príncipi and RDC ships to fight things out. The water dragon takes down the guardian for us, so once again we won't have this part of the final battle available to us:
20240919221637_1.jpg
 

Enuhal

Habitué
Messages
199
Six Crowns for a Singer: Thayn Goron's Triple Crown Full Saga Run - Final Update: Ukaizo

First we have to defeat 2 engwithan sentinels. These guys are vulnerable to constitution afflictions, but we barely have any of those available. They also have super high armor, apparently - despite our penetration bonus via animancy cat and "The Arrow Sings", the animated weapons often underpen unless they crit:
20240919222034_1.jpg
However, the Aspect of Galawain does well, and so does Spark the Souls of the Righteous. We call Incarnates to help as well - the sentinel facing Cymedrol does okay damage, but we have unbending at the ready. In the end, our sheer numbers and the extra damage from our chants do the job:
20240919222141_1.jpg

20240919222223_1.jpg

20240919222356_1.jpg
Time for the faction battle - we use most of the same tactics we did for the attack on Fonferrus, but we don't sabotage ourselves thist time by destroying our own animated weapons via a figurine summon. Sjáanda goes for defensive mindweb, time parasite, and starts spamming amplified waves - she also puts reaping knives on Doador in case her ascension runs out, for some extra PoE1 vibes. The insect plague is much more effective here, and the Aspect of Galawain manifests as a huge bear this time around:
20240919223015_1.jpg
Hazanui Karu abjures our animated weapons, but we're at 6 phrases, so new ones are coming soon:
20240919223400_1.jpg
The melee fighters of the RDC have now fallen thanks to our summons, Amplified Waves and Sparking the Souls of the Righteous - We storm in, with the Aspect of Galawain leading the charge and providing a great target for more Amplified Waves:
20240919223503_1.jpg
This is the final RDC soldier - victory is ours, and we meet with Eothas to end the run:
20240919223547_1.jpg
In the end, level scaling didn't feel too different in the lategame - the endgame battles were still relatively simple. It was felt by far the most during midgame boarding battles and during the first battle in Shadow under Neketaka, which was propably the hardest battle during this run (which is unusal - it never stood out to me before).

Here are my thoughts on the subclasses/multiclasses I tested out during this run:

Ancient: This is relatively close to a normal (Animist) Druid. I didn't feel the negatives much, there were maybe two battles (both against skeletons) where they turned out to be an issue. The unique ancient spells can be pretty good - the sporelings are especially useful because they are super tanky early on when such tankiness is needed. I did lean in on the plant/beast theme by using The Spire of Thicket Green with the +3 to both power levels enchant. This gave us good FotD duration, summons and insect plagues. The druid in general felt quite good in the early game and in the lategame, but surprisingly somehwat weak in the midgame, because some of the super powerful PoE1 tools, such as shapeshifting and Relentless Storm (which is still good, don't get me wrong), have been heavily nerfed. Overall I think a wizard is mostly better for doing a similiar job (though FotD is hard to replace), but in the super early game the Ancient may just have the edge.

Ascendant: A bit interesting. I used The Red Hand for that one, but the special enchant cone fire attack from Fire in The Hole propably does a better job at ascending very fast (but on expert mode, without seeing the AoE, I didn't feel like it would work for me). Ascension was often happening in 2-3 doubleshots. Being an Ascendant instead of a regular cipher is a bit of a tradeoff (and in the early game, when you want to charm something asap, it's maybe not ideal) but gets extremely powerful at higher levels, especially when combined with Salvation of Time. Since this is the first time I've played a full run with a cipher in deadfire, I don't have a real comparison to the standard class; It seems powerful, especially in longer battles, but I did like how it handled in PoE1 a bit more.

Beckoner: This subclass is very strange in some ways - focusing on summons but having the summons have low health, so they aren't tanky at all, but, having double the numbers, dealing insane damage. It's not the most exciting to play, and has some weaknesses early on. The ogres start getting strong, but you still have times when you just don't have any summons up due to the reduced duration. This gets really much better with Sasha's Singing Scimitar (once enchanted) when you can empower your first summon spell in every single battle and even get some phrases back, which allows for constant summoning for much of the battle. That scimitar is awesome for every chanter. Without checking on auto-attack AI for the ogres/swords this would propably be too much of a hassle, and the tiny summons can look a bit silly at times. However, once we had the scimitar and ancient weapons, the power level was definitely there (though not a lot of variety in gameplay).

Priest of Eothas: In my last run, Xoti taught me that despite all the nerfs to priests, they are still incredibly useful in Deadfire, especially on PotD. The differences between her and Doador are small, Xoti has a better level 1 unique spell and cool equipment, though her stat distribution isn't as streamlined. Still always good to bring such a priest.

Battlemage (Unbroken/Illusionist): So, the the special illusionist power automatically granting mirror images when first attacked is definitely good for tanking, and it's nice to have something to do while taking hits aside from a few paladin support spells. Still not too much impactful spell options until late in the game when the spellbook expands, mostly because accuracy for the wizard spells was pretty terrible so they weren't the most impactful. Going illusionist robs us of the armor rating bonus spells, so maybe a no sublcass wizard would've been better for this - but I guess any class combined with Unbroken (or Shieldbearer of St. Elgca) will do the job for tanking. I guess Herald is still the most impactful choice here, as much as it saddens me to say.

 
Last edited:

Enuhal

Habitué
Messages
199
Introducing Atara - A PoE1 cipher using only official companions

On Page 2 of this thread there was a discussion about the viability of the official companions in PoE1; Specifically, there was some doubt cast on Edérs ability to adequately do the job as the sole tank of a party. My side of the argument was that the official companions can do the job just fine - however, I've never actually done a PotD run without any custom NPCs, so I decided to back up my arguments with an actual run. This is played on PotD - no other settings. It is also planned to be a PoE1 only run (since, with Triozum, I already played Deadfire with official companions - except for Act 1, so I might follow up with an attempt to do Deadfire Act 1 without recruiting adventurers), and a shortened one at that - I'm skipping long-winded combat-heavy content such as all DLCs, the Endless Paths and the Bounties. I've done such a run before and know that this will let us end up exactly at level 12 at the end, which means that there will be no level scaling (you need level 13 to even be offered the option - and for Act III scaling, we will skip a few Act II sidquests before the Act transition, so the option won't be there as well).
Obviously, without any custom NPCs Act 1 will have to be played with an incomplete party, and since the Temple of Eothas and Caed Nua are some of the hardest parts of a no-reload run anyway, this should be the most difficult party by far (in fact, I think that if I get past Caed Nua, this run shouldn't be too challenging at all). The optimal choice for a Watcher to balance out a missing party member early on should be a Cipher, thanks to Whisper of Treason. That way we also have a "Mechanics" character, which can be a bit of a problem otherwise.

Atara starts with might, dexterity and perception at 14, intellect at 16 and constitution/resolve at 10. She's a moon godlike (very good in PoE1, not quite as good in Deadfire) and picks up Whisper of Treason + Eyestrike as her opening spells. The prologue is fairly easy as it usually is, we get to level 2 and pick up Draining Whip and Soul Shock. Running directly to Gilded Vale, we meet Aloth and get him Chill Fog + Arcane Veil immediately. Atara also recruits Edér, and we hit level 3:

Atara: Mental Binding, Amplified Thrust
Aloth: Combusting Wounds, Necrotic Lance
Edér: Weapon and Shield Style, Defender

Carefully, we sneak through Magran's Fork without triggering any battles and recruit Durance, who learns Inspiring Radiance. Now we move through Black Meadow to the doors of Caed Nua where we find Kana, who learns "But Reny Daret's Ghost", Ancient Memory and "Come, Come Soft Winds of Death". For now, he chants "Blessed Was Wengridh" and "At the Sight of their Comrades".

Our Act 1 party is assembled, and we travel back to Valewood where we clear out the bear cave:

Atara casts Whisper of Treason on one bear, Durance, who always opens combat with Inspiring Radiance, activates Armor of Faith for safety, Aloth uses the two Arcane Blasts and adds a Minor Missles on the biggest remaining foe. Whisper of Treason allows for a convincing victory:
20240920103700_1.jpg

20240920103819_1.jpg
We also take down the bandits to free the cook, Fulvano's Gloves go to Durance to help out his pitiful dexterity. Meanwhile, Atara has the minor cloak of protection from the prologue ruins, and Edér got the minor ring of protection we found in a hidden stache. Next time, we will start doing most of the various quests in and around Gilded Vale.
 

Antimatter

Administrator
Staff member
Messages
1,808
Congrats on your victory! And yay for a run with companions instead of mercenaries. I've always been more a fan of BG than IWD, so customly created companions have seemed less interesting (and less challenging) to me, especially since you can set up their attributes etc.
 

Enuhal

Habitué
Messages
199
Atara II - Questing in and around Gilded Vale

In Gilded Vale, we finish "Against the Grain" with a diplomatic solution and find another ring of minor protection for Durance. After that, we travel to Esternwood - as I try to get Durance close enough to a group of wichts to hit all of them with Radiance, I soon learn that I can't keep him in his robe - he needs a decent set of armor (for now, I decide to put him in a breastplate):
20240920163003_1.jpg
With a fine arbalest for Atara from the graveyard, we move to Madhmr Bridge. The xaurip skirmishers here can be a bit dangerous, but Durance is able to keep Edér alive even through stun effects (or remove them with Supress Affliction), and eventually Atara can paralyze our foes with mental binding:
20240920164621_1.jpg
For the two trolls, we use Combusting Wounds, Minor Missles, Bless/AoF, Divine Mark, Soul Shock and the phantom summon:
20240920165214_1.jpg
We deal with the looters and move to Black Meadow, where we first take on the bandits. The daze effect of Aloth's Arcane Assault helps Atara to charm the bandit leader, a very powerful ally:
20240920165719_1.jpg
Our cipher is not done yet - a second Whisper on a ranged attacker, and Durance helps out with Blessing/AoF, later on Iconic Projection, Aloth hits with Combusting Wounds and Minor Missles while protected by Arcane Veil - this turns out to be a very convincing victory:
20240920165948_1.jpg
I decide not to fight the bigger troll groups and forest lurkers yet and instead move to the Compass, where we make our way to the healer. The beastiary experience gets us to level 4:

Atara: Mind Blades, Biting Whip
Edér: Hold the Line
Kana: White Worms Writhed, Beloved Spirits
Durance: Aggrandizing Radiance
Aloth: Eldritch Aim, Hardened Veil

A combination of our tools, mostly priest buffs, Whisper, Combusting Wounds/Arcane Assault and the phantom, get us a victory over the big xaurip group to the east:
20240920172416_1.jpg
The ghouls are mostly dealt with via Radiance and some aoe damage from Combusting Wounds, Mind Blades and Arcane Assault (with the help of AoF for defense). Similiar spells are used against the sporelings.
Back to Black Meadow - we acquire Fulvano's Boots for Edér and start taking on the various troll groups - they have low will saves, so we can always keep one troll charmed and use some of our fire damage abilities:
20240921125730_1.jpg

20240921125911_1.jpg
The two forest lurkers are a bit tougher, but we haven't used many spells yet and go all out on our remaining damaging abilities while Edér takes the hits (he's using Kana's brigadine):
20240921130449_1.jpg
Now to Magran's Fork - we go all out on Ludrana before she can finish a spell, our backline does get vulnerable due to this but we switch to melee weapons and use Whisper to get a numbers advantage:
20240921130853_1.jpg
Against larger groups of enemies such as the wolves, Armor of Faith is ever more important as Edér can't tank all of them without a chokepoint - we also can use double whisper after one arbalest shot to even up the numbers relatively quickly:
20240921131529_1.jpg
The battle against the big boar group goes extremely well. Now I'm convinced that the official NPCs are actually pretty great - this is, so far, going much better than with Thayn Goron's customized party. The fact that the official companions are usually one level above hired adventurers certainly makes a difference, and so does the fact that I have, by now, refreshed my experience with PoE1:
20240921132308_1.jpg
 

Enuhal

Habitué
Messages
199
Atara III - The Temple of Eothas

This is the first truly frightening area that I am definitely not looking foward to clearing with an incomplete party. Before we enter, we buy the animat figurine and some food from the inn. We have to make very careful use of chokepoints here so our lacking numbers don't impact combat too much. Kana's new "White Worms Writhed" invocation is quite powerful, helping us on the upper level by blowing up some spiders:
20240921133713_1.jpg
The group with the skuldr king suffers Combusting Wounds + Chill Fog - a devastating combo by Aloth, which can win most early game battles if you find a good chokepoint that forces enemies to stay in the fog:
20240921134343_1.jpg
Downstairs, we use our animat figurine for the first big group of shades, which takes out most of the damage as the enemies focus on our allied vessel - still not the easiest battle, but since we had planned to rest after that one anyways, we might as well use all of our per rest resources:
20240921150423_1.jpg

20240921150757_1.jpg
After resting (with the accuracy bonus against spirits), we throw in some food and use Combusting Wounds and Whisper of Treason to our advantage for the next shade group:
20240921151656_1.jpg
So far we've been doing very well, but the group of oozes and spirits further into the dungeon is what really gets us in trouble - a phantom gets a long duration stun on Edér, which is a huge problem as his health immediately starts dropping, and Durance demonstrates why low dexterity is so bad on a priest as he can't cast the spells required to keep our fighter alive in time:
20240921152513_1.jpg
However, as Edér gets knocked out, the phantom also dies, and the others are able to clear up the three remaining lesser oozes:
20240921152606_1.jpg
We are forced to rest again, now out of camping supplies, but we really only have to face the final group here now - the big skuldr tribe with two kings leading it. To help out Edér at the frontline we add in the animat figurine, though our chokepoint is a bit too large, so some enemies move past those two. Still, Combusting Wounds, Chill Fog, Whisper of Treason etc. do the job:
20240921153140_1.jpg
That was the first big hurdle - though with how tough the phantom stun was for us, I'm not looking forward to Caed Nua, where phantoms are far more plentiful.
 

Enuhal

Habitué
Messages
199
Atara IV - Caed Nua

One of the hardest groups in Caed Nua is the very first one, featuring phantoms, whisps and shadows - we call in our animat figurine here, but Edér gets confused by a whisp, which is really bad for us - however, the animat holds the front line until Edér returns to us and we're able to deal decent damage courtesy of Aloth (who uses Eldritch Aim, Combusting Wounds and Arcane Assaults):
20240921154454_1.jpg
Still, with two phantoms and one whips left, the enemy spirits are able to stun and take down Durance - with very little we can do to stop it. Kana calls in our own phantom, which finally grants us victory:
20240921154613_1.jpg
Challenging a second group like this with only one phantom and earth blights is potentially troublesome, because we didn't rest yet - but Atara is able to charm both blights which gives us a big advantage:
20240921154904_1.jpg

20240921155028_1.jpg
Time to take a nap, with the accuracy bonus against spirits of course. Once again, the next group with phantoms is really tough - the stuns are just coming in on Edér, but he is able to activate his second wind to save himself this time around:
20240921155645_1.jpg
The flame blights in front of the keep are easy enough to take down, and before challenging the big group in the throne room, we sneak into the library, take down the penultimate group with phantoms and sneak out to rest once again.
For the big group in the main keep we activate our animat figurine once again, Aloth gets a good angle on Eldritch Aim + Combusting Wounds + Fan of Flames (all these foes are somewhat weak to fire damage) - while Durance gets into some trouble here, his armor keeps him alive and the battle goes fairly well:
20240921160721_1.jpg

20240921160908_1.jpg
We fight our way through the spiders in the dungeon and make it to Maerwald - however, we are out of camping supplies and I am not entirely sure that the party has enough spells left to secure a victory, so we return to Gilded Vale for a rest and some more supplies. Back to Caed Nua, and we take on the final hurdle in Act 1.

After talking to Maerwald we run back immediately to the door, Edér blocks it - with our speed chant, this is easy enough to execute. Maerwald's fireball only hits Edér, we target the old watcher with our arbalests and start buffing up. As Maerwalds blights get closer, our foe puts down a chill fog and follows up with fan of flames - we are forced to give up our chokepoint. I don't want fan of flames to hit us and we can't afford to fight inside a chill fog:
20240921162804_1.jpg

20240921162933_1.jpg
The old watcher does destroy one of his own blights, and we are now in a pretty good position, because Maerwald runs into his own chill fog while we are completely out of the area of effect. The blights still haven't really caught up with us yet, and now we attack Maerwald at range with Minor Missles, Necrotic Lance and the phantom summon - Maerwald falls, victory is ours:
20240921163039_1.jpg

Talking to Edér after the battle gets us a level up:
Edér: Vigorous Defense
Kana: Sure-Handed Ila Nocked her Arrows with Speed
Atara: Puppet Master, Recall Agony
Aloth: Expose Vulnerablies, Fireball

Now we can finally start assembling our intended party for the remainder of the run. Things should get much less tricky with access to all types of companions.
 

Enuhal

Habitué
Messages
199
Atara V - Defiance Bay Sidequests

While avoiding all combat, we recruit Sagani, Hiravias and Grieving Mother, taking Hiravias into the party - he picks up Wildstrike Shock and Weapon Focus: Peasant to start with. In Defiance Bay, we plan to recruit Pallegina, picking up the wood beetle figurine on the way and buying the wildstrike belt before doing "At All Costs", where we side with the Doemenels (as we plan to do their faction quests this time around - the easiest and quickest by far):
20240921234050_1.jpg
Kana gets swapped out for Pallegina, who picks up Vielo Vidorio, Lay on Hands, Intense Flames and Sworn Enemy. I have previously claimed that Pallegina can make for a great supporting damage dealer, and I intend to show that during this run. She's mostly going to wear medium armor, dualwield to get better full attacks for Flames of Devotion and use her supporting abilities to help out everyone else - though her most powerful contribution will hopefully be her initial burst damage with Wrath of the Five Suns (yet to come).
Doing quests in First Fires, Brackenbury and Copperlane involves little combat. We have the Doemenel invitation, so even the "Two Story Job" is entirely non-violent for us. Our first battle is against Nyrid - Pallegina uses Sworn Enemy and FoD on him, Atara helps out with Puppet Master, Hiravias goes for Returning Storm, Aloth contributes with Combusting Wounds and Expose Vulnerabilities while Durance goes for the usual cleric buffs:
20240922002518_1.jpg
Palleginas upgraded FoD grants everyone a nice speed boost, and soon the room is cleared out. Our next battle is for "Changing of the Guard", but it's 6 vs 1, so no real trouble here:
20240922004816_1.jpg

The party levels up:
Edér: Superior Deflection
Pallegina: Wrath of Five Suns (the big one - this is amazingly strong in PoE1, especially in the early midgame)
Durance: Interdiction
Atara: Phantom Foes, Marksman
Aloth: Bounding Missles, Superior Deflection
Hiravias: Greater Wildstrike Shock

We travel back and forth to Caed Nua for the Yenwood Field questline and take on some attacking Leaden Key agents there. Next, we move to Ondra's Gift where we get into a battle for the Crucible Knight questline - this is just a regular Wrath of the Five Suns (85 single target damage with one very quick ability that even leaves behind Sworn Enemy is super powerful for this level), and it can be hugely improved with Scion of Flame (which also boosts FoD) and Penetrating Shot (I'm not going for that during this run, focusing more on consistent melee damage, but it's quite a powerful way to use Pallegina, especially with additional scrolls and item-based spell charges):
20240922093714_1.jpg
At this point I realized that I forgot about "The Parable of Wael", so I did that first, and since Aloth got injured in Ondra's Gift (because his Arcane Veil ran out and I didn't notice in time) I used my figurines for an overwhelming victory as I was going to rest anyway:
20240922094457_1.jpg
On the way back to Ondra's Gift we buy Borresaine for Atara, turn in some quests and get Shod in Faith for Pallegina. Some more minor sidequests, and we get into another battle for "All Hands on Deck", where we have to "Withdraw" a surrounded Durance, but Hiravias with Returning Storm and his Spiritshifting deals so much damage that the battle ends soon after that:
20240922102900_1.jpg
Some of the more difficult sidequests are still left, but it's time to progress the main storyline for now.
 

Enuhal

Habitué
Messages
199
Atara VI - Defiance Bay Mainquests

We enter the catacombs - a big battle against trolls and sporelings occurs here, where we make use of most of our current tools - Blessing, Dire blessing, AoF, Divine Mark on Durance, Returning Storm, Burst of Summer Flame, Sunbeam on Hiravias, Mental Binding on Atara, Wrath of the Five Suns plus FoD on Pallegina, Eldritch Aim, Combusting Wounds, Chill Fog, Expose Vulnerabilities on Aloth:
20240922110027_1.jpg
Helig dies to a single Wrath of the Five suns and a scepter hit at range:
20240922111551_1.jpg
And we go on to infiltrate the cult meeting. At the Sanitarium, we complete Aloth's quest and start "The Man who Waits" - the big battle is a bit challenging for us this time around, as both Aloth and Edér get hit by prone effects - Aloth barely survives due to Pallegina healing him up and activates Arcane Veil, but Pallegina herself is in trouble as well:
20240922123644_1.jpg
Durance is able to heal her up just in time, and once Hiravias spiritshifts and goes on the offensive the enemies quickly start to fall:
20240922123911_1.jpg
The party levels up:

Edér: Overbearing Guard
Cipher: Silent Scream, Pain Block
Pallegina: Zealous Charge
Aloth: Concussive Missles, Confusion

Before going to Heritage Hill, we quickly tackle "The Final Act", where we get to use Confusion and Calling the World's Maw for the first time:
20240922130402_1.jpg
Also, it's daytime and we haven't done Clandestine Cargo yet - at this point it's not very difficult anymore, but we take the opportunity to finish this one and Brave Derrin:
20240922133846_1.jpg
Now to Heritage Hill - we find the missing sentries, and our party except for the tanking Edér gets paralyzed for a few seconds, but we are able to recover and win with a Whisper of Treason on one guard and Wrath of the Five Suns + some more fire damage effects on the spirit:
20240922135031_1.jpg
Valtas Manor is easy work thanks to the availabilty of great chokepoints:
20240922135710_1.jpg
We turn in the minor quests and progress Edérs personal quest before making our way towards the tower - here we have the big battle for this quest - three dangerous skeletal wizards, and we are somehow able to take all of them out before they get to cast a single spell - one with Wrath of the Five Suns and a Borresaine shot, two with Calling the World's Maw + Aloth's spells and Pellegina's attacks (she has super high movement speed from her aura and the Äru Brekr armor, so she can get into the enemy backline extremely quickly):
20240922150453_1.jpg

20240922150644_1.jpg
That was a very good battle for us - making it up the tower now is easy enough, we don't even need to rest - once the quest is finished, we take the opportunity of all the extra camping supplies laying around here to rest with accuarcy against spirits as we make our way to the Whailing Banshee - with a few priest buffs these spirits don't bother us too much at this point, and we get to level 8:

Edér: Wary Defender
Pallegina: Two Weapon Style
Durance: Painful Interdiction
Atara: Mind Lance, Weapon Focus: Adventurer
Aloth: Alacrity of Motion, Weapon and Shield Style
Hiravias: Two Weapon Style

To finish up things in Defiance Bay, we tackle "The Forgotten" - with both a wizard AND a druid we have great tools for taking down enemy spellcasters at range before they get too dangerous, and Pallegina's Wrath + insane movement speed allows her to help finish whomever the opening spells don't quite take down:
20240922155218_1.jpg

20240922155306_1.jpg
Things are looking quite good. However, we don't want too much more experience before moving to Act 3, so we will go straight to "Through Death's Gate" next, which can never be taken lightly.
 

Enuhal

Habitué
Messages
199
Atara VII - Through Death's Gate and the end of Act II

We move directly to Clîaban Rilag, ignoring Dyrford Village/Crossing for now. A quick stop to complete Edér's side quest and we enter the ruins. For any druid groups we find, we make use of the scroll of defense + scroll of protection combo, so while we get hit with quite a few damage over time spells despite our best efforts, we do quite well at surviving them:
20240922161156_1.jpg

20240922161330_1.jpg
However, in the middle of the map we run into a spot of trouble as Pallegina walks straight into a trap during combat - we didn't see that one at all, but luckily the nearby enemy group wasn't all that dangerous and mostly already dealt with:
20240922161657_1.jpg
After a quick rest, we move further though the dungeon - for another big group of druids, Aloth hits an amazing confusion spell:
20240922162333_1.jpg

20240922162631_1.jpg
You can see that, despite that amazing confusion and our scrolls, we end up still taking quite a lot of damage - never underestimate these druids!

Near the stairs down to level 2, we systematically clear out the sporelings and spores, using Hermit's Hat on Edér and figurines to trigger traps that we can't reach safely:
20240922163013_1.jpg

20240922163034_1.jpg

20240922163357_1.jpg

20240922163453_1.jpg
That went rather well; Level 2 is fairly easy as per usual, and move back outside. Its nearing the 17th of the month, so we quickly visit and kill Raedric - quite easy at our level:
20240922170432_1.jpg

20240922170548_1.jpg
However, the gloves of manipulation aren't there when we search the dungeons. Very strange, but there's nothing we can do about that now.

We turn in our quests at Defiance Bay, start the animancy hearings and fight our way past one last Leaden Key group:
20240922175631_1.jpg
Still at level 8, we leave for Twin Elms and start Chapter III.
 

Enuhal

Habitué
Messages
199
Atara VIII - Starting Act 3

On the way to Twin Elms, we pick up the Sealed Missive:
20240922175956_1.jpg
Once we get into the city regions, we explore a bunch, pick up various quests, turn in minor tasks and reach level 9:

Edér: Armored Grace
Pallegina: Aegis of Loyalty
Atara: Ringleader, Borrowed Instinct
Aloth: Call to Slumber, Malignant Cloud

The first fight we get in is when we take Vela for Sacrificial Bloodlines - luckily, having just reached level 9, Hiravias can use Returning Storm for that one:
20240923104142_1.jpg
We pick the evil solution here for some quick experience as we don't have the required stats to trick the quest giver and don't want to get into a huge fight. We also decide that we can get away with doing the Berath god quest right away, as we want the sabre from Blood Sands for Pallegina. We get into position, call in figurines to block the stairs, use our defensive scrolls and assassinate the keeper:
20240923105114_1.jpg

20240923105340_1.jpg
The other druid leader at Elmshore is one I rarely ever fight, but Atara doesn't have the resolve to talk her down, so we draw back her allies and use Call to Slumber + Calling the World's Maw, which gets us the victory despite some dangerous spells on her side:
20240923110142_1.jpg

20240923110420_1.jpg
We have to return to Caed Nua because of an unRaedric attack, and we take the opportunity to upgrade most of our gear to exceptional (we also bought Blesca's Labor for Pallegina). With level 9 and good weapons at the ready, I decide to backtrack a bit - next, we will clear the various wilderness areas that I have all skipped so far.
 

Antimatter

Administrator
Staff member
Messages
1,808
I keep enjoying your reports, they remind me of my own experience when I "mastered" PoE (not to complete the whole game without any reload, mind you). Once you manage to "perfect" your skill/spell choices, there is extra fun in winning encounters.
 

Enuhal

Habitué
Messages
199
Thanks, I appreciate it @Antimatter

Atara IX - Wilderness Areas

We start out exploration at the Woodened Plains, which is easy enough to clear out. At Searing Falls, we get to fight big groups of drakes, where Prayers Against Fear, Relentless Storm, Form of the Delemgan and the usual cleric accuarcy buffs reign supreme:
20240923121557_1.jpg
Even Cail the Silent stands no chance against that combination:
20240923123058_1.jpg
A quick turn-in at Defiance Bay, some shopping and we travel to Stormfall Gorge. The battles at the southern part of the gorge are, honestly, unreasonably tough. There is almost no reward for even going there, but they are pretty much on par with the hardest chapter III wilderness battles in terms of difficulty, if not even tougher. We aren't even close to having Prayer against Treachery, and the various spores use not only confusion but also charm effects - the oozes also can hurt a lot, and we eventually have to rest and re-buy camping supplies:
20240923130102_1.jpg

20240923130439_1.jpg
We move inside Lle a Rhemen, where Prayers Against Fear and Imprisonment are crucial for the bigger battles, though specter explosions still do a lot of damage to us:
20240923151431_1.jpg
As a result we need to rest after the big groups of spirits. Luckily, for the spiders, Hiravias has Hold Beasts, which grants us a huge advantage:
20240923152027_1.jpg
And after the previous run, I'm very aware of the incoming spiders triggering the trap at the start of the final part of the area, so we stay super close to the entrance and manage to avoid the damage:
20240923152306_1.jpg
All right! We also clear out the Pearlwood Bluffs, though nothing of note happens there. Now we can continue our backtracking with the Dyrford Village/Crossing sidequests.
 

Enuhal

Habitué
Messages
199
Atara X - Dyrford Crossing

We travel to Dyrford Crossing to do the three sidequests there, which should get us to level 10 - We start with the spider lair, since we've been doing so well against spiders back in Lle a Rhemen. Returning storm is saved for the ogre:
20240923153752_1.jpg
Back at the Crossing, most of the map is easy to clear, and we do the Nest Egg task without any trouble - the only danger is the group to the east - we pull them back to the Chokepoint and hit them with Call to Slumber / Calling the World's Maw:
20240923154732_1.jpg
The party still gets hit by an Infestation of Maggots, so we use the Scroll of Protection just in case, but since we've already dealt with Through Death's Gate, this group is easy enough to defeat:
20240923154853_1.jpg
Now we move downstairs to the skaenite hideout, where we can't disarm some of the traps as we lack mechanics skill (they are quite high level considering the area), so we have to carefully move past them one by one and do the very few fights we need to complete to get to their leader:
20240923155350_1.jpg
A quick level up, a and we take the more or less peaceful solution before turning in the remaining quests at the village.

Edér: Weapon Focus: Knight
Durance: Empowered Interdiction
Atara: Apprentice's Sneak Attack
Hiravias: Heart of the Storm
Pallegina: Weapon Focus: Ruffian
Aloth: Arkemyrs Wondrous Torment, Field Triage

Next time, we shall return to Twin Elms.
 
Last edited:

Enuhal

Habitué
Messages
199
Atara XI - The Northweald and Yenwood Field

Most of the Northweald is rather easy, except for the fight against the group in front of the path to Hylea's Temple, which has three Adragans in it. Ideally, we would avoid such a battle until we had Prayer Against Treachery, but the only other source of experience that doesn't involve enemies that can use dominate is Yenwood Field, and that alone wouldn't get us to level 11. The first Adragan doesn't survive our opening burst damage, the second is hit by Metal Binding and ranged attacks. The third one, however, is too far in the back and able to dominate Durance - of all people - despite me using snowcaps on the entire party:
20240923172208_1.jpg
The problem here is that Durance, due to his low dexterity and propably also because of the wrong casting priorities on my side, hasn't gotten to cast Prayer Against Imprisonment yet, so the party is vulnerable to petrification - You can guess which ability the Adragan uses next. His target is Aloth, who gets petrified for a very long time:
20240923172342_1.jpg
Even though the domination on Durance is a short one, without an immediate Supress Affliction, Aloth dies right away, as petrification multiplies the damage taken and is essentially a death sentence if there are at least some other enemies attacking the target:
20240923172449_1.jpg
Luckily, Durance is back to his usual self and can cast his Prayer Against Imprisonment while Relentless Storm stuns the Adragan, which is just what Atara and Pallegina need to take it down:
20240923172548_1.jpg

20240923172638_1.jpg
Surviving that tough battle gives us the opportunity to peacefully deal with the Sky Dragon and get our blessing from Hylea. We're close to level 11 - Yenwood Field should do the trick, and we have to return to Caed Nua anyway due to an unresolved attack. Our buffs include the defensive scrolls as well, even Champion's Boon on Atara - Aloth lands a good confusion spell where the battle rages the most:
20240923174539_1.jpg
And Atara starts unleashing absolutely devastating Silent Screams all over the battlefield - look at that one: 5 crits and great damage numbers!
20240923174642_1.jpg
Soon, the battlefield is ours - Hiravias even immediately regains his spiritshifting via the Blue Stone Scepter once his first one has run out:
20240923174943_1.jpg
And we get the much awaited level 11 - our penultimate level up for this run.

Edér: Confident Aim
Atara: Amplified Wave (that's a big one - it's going to be amazing), Desintegration
Pallegina: Hastening Exhortation
Aloth: Gaze of the Adragan (another big one), Freezing Pillar

Most notably, Durance now has Prayer Against Treachery available, so we can more easily challenge the Adragan groups in Elmshore or unRaedric and his Fampyrs.
 

Enuhal

Habitué
Messages
199
Atara XII - Elmshore and two more God Quests

Now that we're level 11, we make our way back to Elsmhore - taking down Adragon groups is much easier with both Prayer Against Treachery and Imprisonment:
20240924094908_1.jpg
To the north, the big ogre groups were taken on with the help of protective scrolls - Gaze of the Adragan helps us in defeating these guys quickly, and so does Amplified Wave:
20240924095622_1.jpg

20240924095915_1.jpg

20240924100243_1.jpg
We also like to add in Prayer Against Infirmity depending on what kind of AoE spells they throw on us. Next, a quick visit to Burial Isle to finish Hiravias' quest and prepare our later approach:
20240924101502_1.jpg
Since we have relatively low mechanics, we rest with the mechanics bonus at Caed Nua before going to Galawain's Maw. We take both shortcuts, but Aloth still steps into a trap right there - well, that's annoying:
20240924103348_1.jpg
Well, we talk to Sul' team so we can explore the area. Resting with the Accuracy Bonus against beasts and the Hold Beasts spell help against Oernos:
20240924104028_1.jpg
We don't have the Resolve to talk down the pale elves at Noonfrost, so we have to fight those as well. Glasvahl hits us with a dangerous Blast of Frost, but a second later he's petrified by Aloth's Gaze of the Adragan:
20240924105034_1.jpg
 

Enuhal

Habitué
Messages
199
Atara XIII - Finishing up Act 3 and the way to Thaos

We have to return to Caed Nua for a Vithrack attack - buffing with Prayers Against Treachery, Imprisonment and Bewilderment - after our harsh experiences with Vithracks in the last run, we can't be too careful here, but the fight turns out to be just fine:
20240924112341_1.jpg
The final quest we get to do in Act 3 is The Champion of Berath - Raedric's return, which will propel us to level 12 as it grants a ton of experience points. With Prayer Against Treachery and Amplified Wave on our side, the battle was no trouble at all:
20240924113128_1.jpg

Our final level ups:
Edér: Envenomed Strike
Pallegina: Apprentice's Sneak Attack
Durance: Brilliant Radiance
Cipher: Mind Plague, Sanctifier
Aloth: Infuse with Vital Essence, Sanctifier
Hiravias: Apprentice' Sneak Attack

We rest with craft shop bonus (+3 dexterity) and go on one big last shopping tour to get any remaining enchantments and all the food we can get - though we don't quite have enough money to get everyone a dragon meat dish, with 2 missing to supply the entire party.

On to Burial Isle - we've already cleared the outside previously, now we explore the downstairs areas. With our mechanics of 10, we encounter 1 trap we can't disarm, but things go very smoothly otherwise. Shadow Drakes aren't a real threat to us with Prayer Against Fear, Returning Storm and Amplified Wave on our side:
20240924163339_1.jpg
Only Thaos remains.
 
Top Bottom